
Chapter 33 · Financial reports · 4 min read
General Ledger
The General Ledger is the detailed record behind every other report. Each time you submit a transactional entry, SAABI writes one row for every account that entry touches — a debit somewhere and a matching credit somewhere else — and this report lists them all. Use it when you need to see individual postings rather than totals: tracing what a document did to your accounts, reconciling a bank account against a statement, or finding out why a balance moved. Open it from the sidebar at Reports > General Ledger.
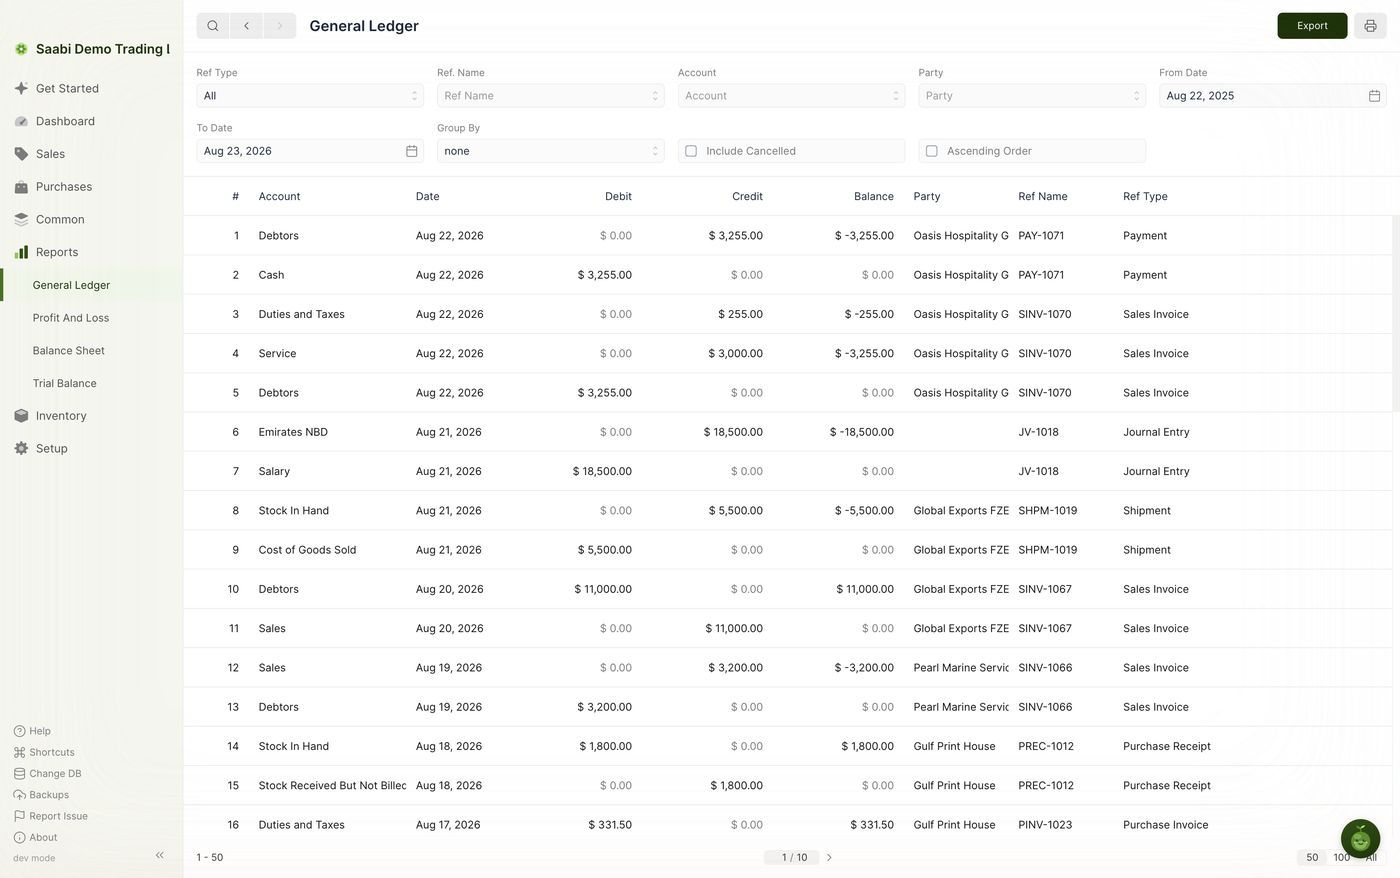
Filters
The filter row holds nine controls. They combine, so setting more than one narrows the report further.
- Ref Type — the type of transactional entry that produced the row. The default is
All. Setting it to anything else limits the report to entries of that type: set it toJournal Entryand only rows created by journal entries are shown. - Ref. Name — the name of one specific document, such as
SINV-1070. This shows only the ledger rows that document created. Set Ref Type first, because the names offered depend on it. - Account — shows only rows where an amount is debited to or credited from the account you pick. This is the filter to use when reconciling a single bank or cash account.
- Party — shows only rows involving that customer or supplier.
- From Date — the earliest date to include. The default is one year back.
- To Date — the latest date to include. The default is tomorrow, so today's entries are always in range.
- Group By — groups the rows rather than listing them flat. The default is
none. Setting Group By toReferencegroups the rows under the name of the transactional entry that produced them, so all of a document's postings appear together. - Include Cancelled — cancelled entries are left out of the report by default. Check this to bring them back in.
- Ascending Order — rows are listed newest first, in descending order of date. Check this to list them oldest first, which is the order you want when reading an account's history forward through a period.
Note
When Include Cancelled is checked, a further column, Reverted, is added to the report to mark which of the listed entries were cancelled.
Tip
Filters apply when you finish with the filter box. After picking a value or typing a date, click anywhere outside the box and the report regenerates.
Columns
| Column | What it holds |
|---|---|
| # | Row number within the generated report |
| Account | The account the amount was posted to |
| Date | The date of the transactional entry, not the date it was created |
| Debit | The amount debited to the account, or $ 0.00 |
| Credit | The amount credited to the account, or $ 0.00 |
| Balance | The running balance down the rows listed, debits adding and credits subtracting |
| Party | The customer or supplier on the entry, where it has one |
| Ref Name | The name of the document that produced the row, such as SINV-1070 or JV-1018 |
| Ref Type | The kind of document it was — Sales Invoice, Payment, Journal Entry and so on |
Every document produces at least two rows, one debiting and one crediting the same amount. A sales invoice with tax produces three: the tax account and the income account are credited, and the debtors account is debited for the total. Reading down the Ref Name column shows you where one document's rows end and the next begins.
Rows carry no Party when the entry does not involve one. A journal entry moving money between your own accounts, such as JV-1018 posting salary against the bank account, leaves that column blank.
Note
The Balance column is most useful with a single account selected and Ascending Order checked. Read that way, the column follows one account's balance forward through the period.
Paging through a long report
The General Ledger is usually far longer than one screen, and it is the one report that pages. The footer carries three controls: the range of rows currently shown, such as 1 - 50; a page control showing the current page and the total, such as 1 / 10, with an arrow to step forward; and a page-size control offering 50, 100 and All.
Narrowing the filters is generally quicker than paging. If you are looking for a single document, set Ref Type and Ref. Name and the report will come back as a handful of rows.
Exporting
Click Export in the top right to save the report as a CSV or JSON file. The export follows the filters, so what you see is what you get. The print icon beside it sends the report to your system print dialog. Both are described in Chapter 32.
Saabi Desktop User Manual 1.0 · covers Desktop 1.0.0 · Something wrong or missing? Tell us